Disclaimer (added 3:15pm): Obviously I work at Yahoo and obviously I know the people who work on Flickr and Zonetag personally. Other clients for uploading information from your phone and capturing context do exist and if you’re interested in finding out more about them then I can recommend reading Chris Heathcote’s post on the subject.
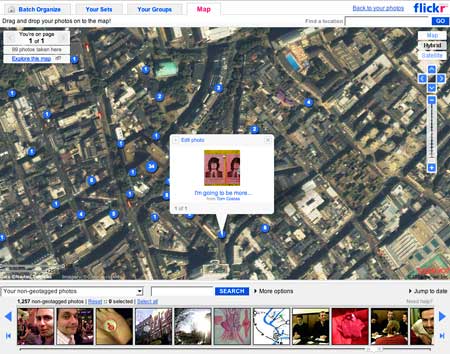
A few weeks ago Flickr released its new mapping features, enabling its users to easily ‘geotag’ their photos. The interface they have created is extraordinarily simple and elegant. A drawer at the bottom of the Organizer contains your photos, the space above contains a navigable and explorable map. Drag one of the former onto the latter and you’re done.
But what if there was a way to automatically geotag your photos as you were taking them and with an accuracy of a few metres? What if the same tool also let you upload your photos while you were walking around town and could also provide you with good privacy options and tag suggestions? When you spotted a nice bit of graffiti or a book about superheroes, you’d be able to take a picture on the spot and have people in the area see it on the map within moments. Just like this:
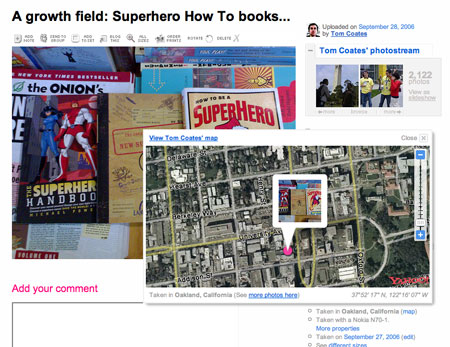
I took this photo in my last trip to the US with my camphone and with just two rapid keystrokes it was being uploaded to the Internet complete with all the information needed to position it almost perfectly within the world. To get it online I used the prototype Zonetag client made by Yahoo Research Berkeley in conjunction with a portable Bluetooth GPS unit that I bought for ¬£70 down the road. This combination of whatsits has made geotagging photographs in the wild absolutely effortless for me, and only took me ten minutes to set up. And no additional costs! It’s all enormously good fun.
Which made me think thatgiven how much I use this stuff and how few other people I’ve met who know about itthis might be a suitable subject for a comprehensive online how-to guide. Which brings me to this article.
Over the next few paragraphs I’m going to work through the whole process of installing and using Zonetag and getting it working with a portable Bluetooth GPS device from beginning to end. You’ll need a Nokia Series 60 mobile phone (more information on the specific makes below), a Bluetooth GPS unit (I’ll recommend one further down the page) and the time to install the (free) Zonetag client. If you’ve got all of these things, it shouldn’t take more than five or ten minutes to get you set up and geotagging your first photos in the wild. But I’m not going to skip through any part of the process so don’t worry. What’s below is every step in totally ludicrous and laborious detail. That way no one will have the excuse of getting lost along the way.
Introduction:
This how-to comprises four sections. The first part is about Which phones you can use with Zonetag, the second about How to install Zonetag and some of the common break-points, the third about How to use Zonetag and get the most of its functionality and the final one is How to get Zonetag working with an external bluetooth GPS device. If you’ve already got a version of Zonetag installed, then you can cheerfully skip straight to the fourth section right now.
Stage One: Which phones can you use with Zonetag?
The first thing you’ll need to be using a Nokia Series 60 phone. I’d recommend using specifically one of the following: the 6620, 6670, 6680, 6681, 6682, 7610, N70 or N90 models. The really new Nokia phones running the third edition of the Series 60 software are still being evaluated for use, I’m afraid. There have been some significant changes to the security model which makes rapid prototyping a bit harder. I use the N70, which has relatively slow UI and is a bit big but is otherwise completely functional and handles this whole process really well.

Stage Two: How to install Zonetag and some of the common break-points:
Installing Zonetag on the phone is the next step and is relatively painless. It does not require you to have transitioned your Flickr account over to a Yahoo ID. You will however need a Yahoo ID to use the service. The one you use for Yahoo! Mail will do quite nicely.
I’m going to go through the whole thing in detail in a second butjust so you don’t get overly intimidatedI thought I’d summarise the whole process first so you can see how simple it will be. To get Zonetag installed all you will have to do is:
- Click on “Install” on the Zonetag site and type in your name and e-mail, and then click “Agree” to the terms and conditions
- When prompted, click the button to log into Flickr and to say that you’re comfortable with Flickr and Zonetag talking to one another
- Download the Zonetag client onto the phone and let it install itself
- Copy your personal authorisation number from the website into the phone to make sure they know they’re allowed to talk to each other
As I’ve said, it’s all pretty painless, but there are some special cases and some places you can get stuck, so I’ll go through each of those now in a bit more detail. The first part of the process is to visit the Zonetag site and click upon ‘Install’ at the top of the page. You’ll be presented with a page that warns you that Zonetag will keep a record of details of the particular cellphone tower that your phone was using when it took a picture. The zonetag client uses this information to suggest useful tags for you when you take a picture, and – if you want – can display this information in your Flickr tags for your photos. You can turn this feature off later if you want.
On this screen put in your first and last name and your e-mail address, tick the terms of use and click on ‘I Agree’ at the bottom of the page.
The next page presents you with an even easier job, particularly if you’ve got already got a Flickr account. Click on the ‘Authorize’ button at the bottom of the page and you’ll be sent off to a page on Flickr where you will be asked if you’re comfortable with the two sites talking to each other. Say yes and move on!
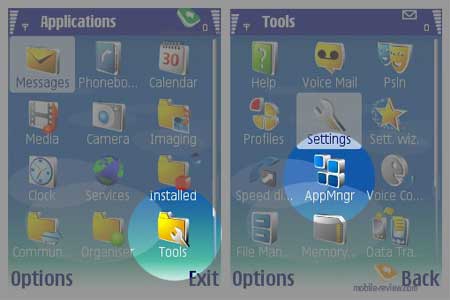
The next stage is where a lot of people come unstuck and it’s normally to do with the defaults on your phone rather than anything with Zonetag itself. So at this stage, I’d recommend checking that your phone is ready to install the application and won’t just reject it out of hand. To check these settings go to your phone and look for a folder called ‘Tools’ in your main menu. Inside that folder look for the ‘Application Manager’ or ‘Manager’ icon. I’ve put a picture below so you can see what menu options you’re looking for:
Once you’ve found the Application Manager, click on it, select ‘options’ and ‘settings’ and you’ll be presented with a menu upon which the first option is ‘Software Installation’. This has three options – install all software, install only signed software and install no software. Make sure that ‘install all software’ is selected. If it is, you’re now ready to continue with the installation process.
If you’re based in the US, the Zonetag site (on the page you should still be on) has a feature that allows them to send you a text message with a link to the application inside it. Tell the site your number, and click on the link in the SMS that you receive. Your phone will go online and get the application and ask if you want to install it. Say yes and you’re done.
If you’re not based in the US, then the easiest option is probably to download the application from this URL: tinyurl.com/pygy8 via your phones web browser. Again it’ll ask if you want to install the application. Say yes to finish the process.
Once you’ve finished installing the software on the phone, there’s just one final stage. So click to get your authorisation code on the web site, and then on your phone navigate to the Zonetag application (on my N70 it’s placed in a folder called ‘My Own’ in the main menu) and then click on the application to launch it. The first time you activate it, it’ll ask you which data connection you want to use to send your photos and data to the service. Once you’ve chosen one, the software will prompt you for your authorisation code. Type the code that the website shows you into the phone and Zonetag has been installed.
NB. At some later point, you should go back to Application Manager and make sure that your phone is set only to install signed applications again. This helps to protect your from viruses and malware. You don’t have to do this quite yet if you’d rather get on.
Stage Three: How to use Zonetag and get the most of its functionality:
Okay. So you’ve installed Zonetag – what’s that got you so far? You should have just entered in your authorisation code, so you’ll still be using the Zonetag app. You’ll notice that there’s a button called ‘back’. If you click on that, the application will continue running on your phone in the background and be ready to do your bidding at any time. Click ‘back’ now. If you want to go back to Zonetag at any time you can navigate back to it through the folder called ‘My Own’ orand this is a cunning Nokia trick you might not knowyou can press and hold the button on your keypad which looks like a black circle and a white square caught in an existential vortex. That’ll bring up the application switcher. If you want to have a play with that now, then do so, although it won’t get you very much.
Now take a picture with your phone. Almost immediately after you’ve taken the photo a small dialogue box will appear asking you if you want to send the photo to Flickr. If you say no, it’ll just disappear. If you say yes, your phone will take you to a screen where – if you want – you can add tags, or change your default options or add a title. If you don’t want to do any of that, you can click on ‘upload’ and you’re done. Your phone will start uploading the photo to the Zonetag servers and then after a few minutes it’ll send the picture invisibly up to Flickr. In and of itself, I find that point, click, upload process pretty useful.
But it’s worth exploring those things in a bit more detail. If when you take a picture you click on the ‘add tags’ button, Zonetag will present you with a whole list of things it thinks might be relevant to where you are in the world, things that it has worked out from the number of the cellphone tower you’re in. Navigate up and down this list and click on the ones you think are relevant and click done when you’re finished and you’ll have tagged your photo in the wild.
If you really want to be hardcore, when you’re exploring the suggested tags, click left and right to bring up whole new catagories of tags including things you’ve used before, nearby venue names and events in your area. It’s all designed to make it as easy as possible for you to add useful information about your photos while you’re out and about.
There are also Action tags which can do a bunch of things including rotate your photos before they get to Flickr. It’s all quite smart. And if you’re interested you can also change your privacy options on the picture so that your mother doesn’t see all the dodgy things you’ve been up to. Having been to the Folsom Street Fair a couple of weeks ago, I can very much recommend using this option.
Stage Four: Using a GPS unit with Zonetag:
Okay, so you’re all set up and familiar with Zonetag, now how do you get it working with an external GPS device. This isfranklyludicrously simple although there is one annoying thing: first you have to go out and buy a Bluetooth GPS unit.
I’ve so far tried two of these – both bought from Tottenham Court Road in London, but also available online in the UK and US. The Holux device that I wrote about a few months ago was pretty exciting, small and accurate, could use a standard Nokia charger or plug into your computer via mini USB which was extremely useful in terms of keeping down the number of cables and stuff I had to carry around. But I’m not entirely sure after a block of time using it that I’d recommend it. The GPS functionality is pretty solid, but the Bluetooth stuff is not. I’d often find that when I started it up the Bluetooth just didn’t come online. If you look on the web you’ll find some people recommending that you keep it in the freezer. Apparently this helps it work better. I’m not sure that’s really the kind of way I want to live my life, and also it would be cold in my pocket so I’ve explored elsewhere and found one that works a bit more effectively.
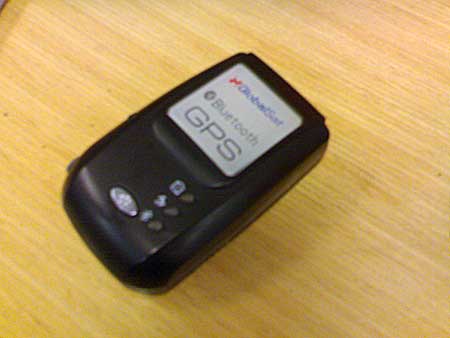
Of the two I’ve used, I’d definitely recommend this one – the GlobalSat BT-338. It’s a little larger than the Holux and a little heavier as well, but it’s still pretty tiny (see the pictures below to get some sense of scale). It uses a non-mobile-phone charger and can’t use USB, but it has a staggering 18 hour battery life and it basically just bloody works. I’ve got better GPS accuracy than the Holux, it works in worse conditions and I’ve never had any trouble whatsoever with the Bluetooth. You can buy it from Amazon.co.uk or from Amazon.com or from good nerdy shops.
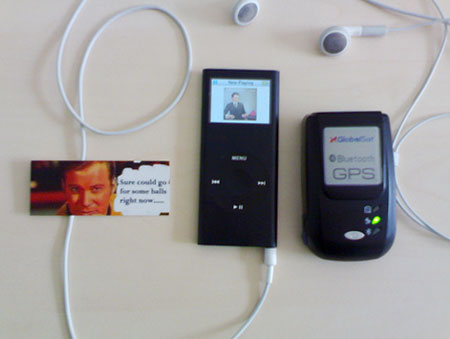
Right, let’s assume you’ve got your GPS unit. Let’s have a look at it quickly and see what’s going on. Most of these devices (at least the screenless ones) have nothing on them but an on/off button and three lights. The top light tells you about the battery life of the device, and will glow red if the battery is low. The bottom one is normally blue and indicates if there’s any bluetooth activity going on – ie. if your GPS is communicating with another device. The middle light is the most interesting. Turn on your GPS unit and go and stand outside for a few moments. The light will start off solid and green and after a few seconds will start to blink and flash. This means that it’s worked out its position by using satellites in orbit and now knows where it is in the world down to a few metres and it’s desperate to share that information one way or another. Literally, to get this device working all you have to do is turn it on and stand outside for a bit.
If you’re interested in how it’s all happening, then Wikipedia has a reasonably good page on GPS but as far as I can tell it basically works by picking up radio signals from a number of satellites and working out the delay between when they were sent and when they were received. This allows the device to determine its distance from each of the satellites. The radio signal also includes information about the satellite’s current position, which allows the little GPS unit to triangulate its position anywhere in the world to within 15 metres.
Because the radio signals can’t pass easily through buildings, you’ll get a better signal when you’re out in the open in a place without too many very tall buildings around you, but some of the newer GPS units even seem to be able to maintain a positional lock inside buildings (if you’re relatively close to a wall or on the upper floors of a building. I’ve been very impressed indeed with the Globalsat on this front.
So you’ve got a functioning GPS device and a functioning version of Zonetag. You’re on the home stretch. It’s almost all done. Your final act is to combine the two. So start up Zonetag and click on ‘Options’. Now scroll down until you see ‘External GPS’ and hit start. Your phone will start to look for Bluetooth devices in the neighbourhood. When if finds your GPS device, select it. If your phone prompts you for a pairing code for your GPS device (this should only ever happen once) then try 0000 if you’re using the GlobalStat and then do a search online for your model number if that doesn’t work.
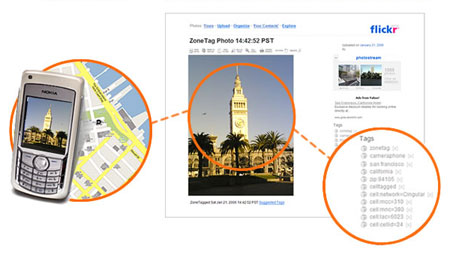
If all this goes to plan, Zonetag will attempt to connect to your GPS unit and will then start spontaneously displaying the data that the GPS device has about your location. From now on whenever you take a picture using the camphone and tell Zonetag to upload it, the photo will appear immediately on Flickr complete with all the geo information you could possibly want – maps and everything! Enjoy!
Let’s repeat that, just in case you missed it. Turn on your GPS device, turn on your phone and start Zonetag. Tell Zonetag to look for a GPS unit and when it’s found yours tell it to connect. Take a picture, say yes to the upload process and you’ve just uploaded and geotagged your first photo in the wild! Well done!
Conclusion:
Anyway, that’s the end of my huge tutorial on every aspect of automatically geotagging photos with your phone. I hope you’ve found it useful and get as much fun from wandering around the place taking pictures of places and sticking them online as I have done. I really can’t recommend playing with this stuff enough. And once you’ve got yourself a GPS device there are all manner of other things you can start to do with it, including installing map software on the phone and contributing to Open Streetmap. But in the meantime start exploring the other photos that people have uploaded from their phones over on Flickr Maps: Photos tagged Zonetag on Flickr Maps. Here are some of my favourites.
